

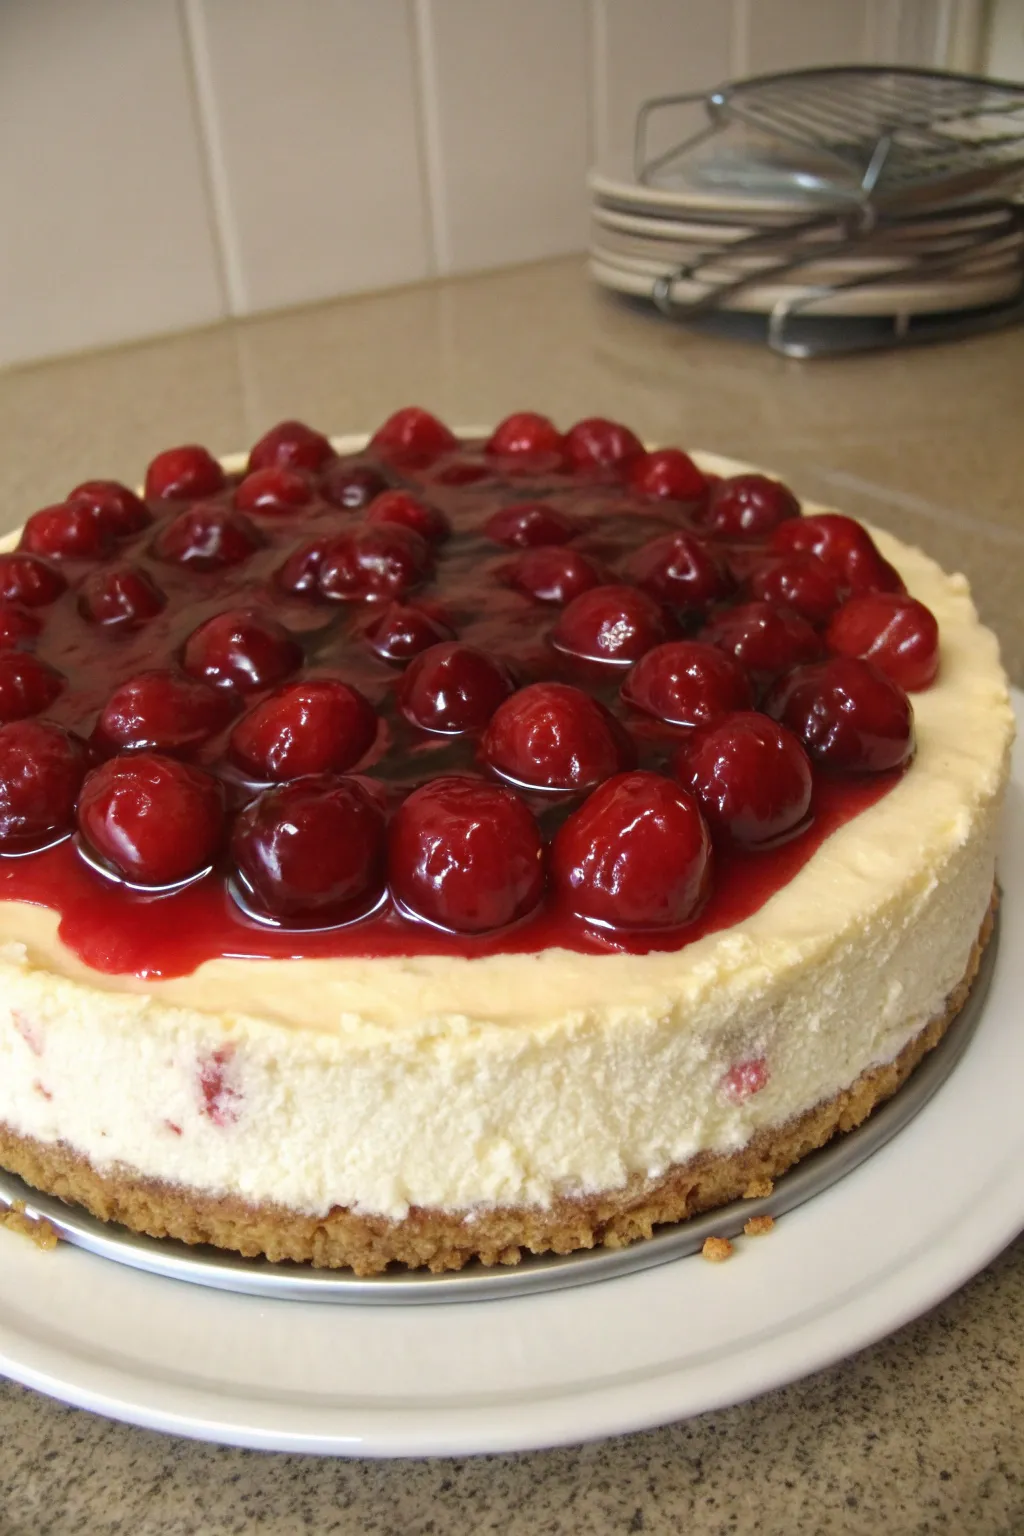


I can still recall the very first time I stumbled upon a cherry cheesecake lush dessert recipe. I was a teenager flipping through my grandmother’s old handwritten cookbook, tucked away in the corner of her kitchen. Among the precious scribbles detailing various family sweets, this one caught my eye because it had the words “cheesecake” and “cherry” in the same line—two flavors I loved but had never seen together in such a playful, layered treat.
Over the years, I’ve tested countless versions, combining different crusts and fillings, trimming steps, and sharing slices with friends who couldn’t believe this light and airy delight tasted as heavenly as it looked. In this guide, I’m sharing every trick I’ve learned (including some of my funny mishaps!) so you can craft a creamy cherry cheesecake layered dessert you’ll rave about for months.
My Personal Journey Into Cherry Cheesecake Lush
When I was younger, I avoided complicated recipes because I was terrified of messing up. The phrase “no-bake cherry cheesecake lush” felt like magic—something that wouldn’t require me to keep checking the oven or worry about cracks in my cheesecake. My first attempt was anything but graceful: I didn’t let the graham cracker layer chill long enough, so the crust merged into the creamy layer. Despite that slip, it tasted incredible. Over time, I realized that balancing the layers—especially the cream cheese filling—was simpler if I followed a few straightforward tips. Now, whenever I prepare my beloved cherry cheesecake luscious creation, I recall those early flops with a smile.

Ingredients and Kitchen Supplies
Before diving into the step-by-step, I always like to gather everything in one place—saves me from shuffling around mid-mixing. You’ll need the following items for this cherry cheesecake lush dessert recipe:
- Kitchen Tools
- Mixing bowls (I use at least two medium-sized and one large)
- A whisk or hand mixer (I’ve found a hand mixer speeds things up)
- Measuring cups and spoons
- Rubber spatula or wooden spoon
- 9×13-inch pan (glass or metal, depending on preference)
- Optional: plastic wrap for covering and chilling
- Crust Layer
- 2 cups graham cracker crumbs (I once crushed them by hand in a plastic bag—very therapeutic!)
- 6 tablespoons melted butter
- 1 tablespoon sugar (or your preferred sweetener)
- Cream Cheese Filling
- 16 ounces cream cheese, softened (I leave it out for about an hour)
- 1 cup powdered sugar
- 1 teaspoon vanilla extract
- 1 tub whipped topping (8 ounces), thawed
- Pudding Layer
- 2 boxes instant vanilla pudding mix (3.4 ounces each)
- 3 cups cold milk (I’ve tried reduced-fat, and it still works)
- Cherry Topping
- 1 can cherry pie filling (21 ounces)
- Optional garnish: extra whipped topping, fresh cherries
I love how flexible this cherry cheesecake cloud dessert recipe can be. You can swap out the graham crackers for cookies if you prefer. I once used chocolate cookies—my nephew devoured half the pan in one sitting. No matter the substitutions, the main structure remains the same: a crunchy crust, a fluffy cream cheese layer, a pudding layer, and a sweet cherry finish on top.
Step-by-Step Instructions
I’ve tried to break down this process into clear, manageable steps. When I first practiced, I realized I needed a solid plan that wouldn’t overwhelm me. Here’s exactly how I craft my cherry cheesecake lush dessert recipe:
- Crust Preparation
- Start by stirring together the graham cracker crumbs, melted butter, and sugar in a bowl.
- Press this mixture into your 9×13-inch pan, forming an even base.
- Pop it into the fridge for about 15 minutes to let it firm up. If you skip chilling, trust me, you’re likely to see your crust blend into the next layer.

- Cream Cheese Filling
- In a large bowl, combine softened cream cheese, powdered sugar, and vanilla extract.
- Beat with a hand mixer (or briskly whisk) until smooth. I usually notice it becomes a bit fluffy.
- Fold in the whipped topping gently, keeping the mixture airy.
- Spread this across your chilled graham cracker layer, smoothing it with a spatula.

- Pudding Layer
- Whisk together the instant vanilla pudding mixes and cold milk until it thickens. This usually takes me about 2 minutes.
- Layer the pudding mixture over the cream cheese filling.
- Return the pan to the fridge for another 15–20 minutes, allowing the dessert to set up.
- Cherry Topping
- Once the layers feel stable, open that can of sweet cherry pie filling.
- Spoon or pour it evenly over the pudding, aiming for a smooth layer.
- Place the pan back in the fridge for at least 2 hours. I prefer letting the dessert chill overnight if I can wait that long—it gives the flavors time to mingle.
Helpful Tips and Personal Flops
I’ve had my fair share of missteps while chasing the perfect cherry cheesecake lush dessert recipe. One time, I tried substituting the melted butter in the crust with a margarine-based spread. The result? An overly salty, oily mess. So, I stick to real butter now. I’ve also learned:
- Chilling is key: Let each layer chill as described. If you rush, the layers can mix.
- Taste as you go: If your cream cheese layer isn’t sweet enough, add a sprinkle of powdered sugar.
- Pudding consistency: If it stays runny even after whisking, add another half packet of pudding mix. Aim for a thick but spreadable texture.
- Decorations: For special occasions, I pipe extra whipped topping around the edges, then toss on some fresh cherries.
I remember my cousin’s birthday where I forgot to let the cream cheese soften fully, and it turned into small lumps in the filling. Although the lumps never fully dissolved, everyone said the flavor was fantastic. It reminded me that small imperfections don’t ruin the dessert.
Variations I’ve Experimented With
I get easily inspired by the flavor possibilities of a layered cherry cheesecake dream bar. Over the years, I’ve tried:
- Chocolate Cookie Crust: Swap graham crackers for chocolate sandwich cookies.
- Cherry Cheesecake Layered Parfait Cups: Construct in individual cups instead of a pan for an elegant party dessert.
- Cherry Cheesecake Lush with Cream Cheese Filling and Berry Twists: Add a few spoonfuls of mashed strawberries side-by-side with the cherry filling for a swirl effect.
- Pecan Shortbread Base: Crumble shortbread cookies, add chopped pecans, and combine with melted butter for a nuttier crust.
- Fluffy Cherry Cheesecake No-Bake Delight: Focus on super-airy layers by whipping extra whipped topping into the cream cheese.
In each scenario, the core concept of creamy cheese, a sweet fruit topping, and a pudding layer remains the same. You can truly experiment with different textures and flavors without losing the dessert’s identity.
Storage, Leftovers, and Setting
When I have leftovers, I cover the pan tightly with plastic wrap and store it in the fridge. It can stay fresh for about 3–4 days, though I must admit it rarely lasts that long in my home. If you’re planning to make it ahead for a gathering, get it done the night before. That extra time makes each component fuse into a smooth and sweet cherry cheesecake creation that is downright irresistible.
Approximate Nutritional Info
Although I’m no nutritionist, I’ve tried to estimate the macros for a typical serving (assuming around 12 servings per 9×13-inch pan). Each serving might sit around:
- Calories: Approximately 300–350
- Fat: Likely 15–20 grams
- Carbohydrates: Roughly 35–40 grams
- Protein: Around 4–5 grams
If you have health considerations, you can use reduced-fat cream cheese or sugar-free pudding mixes, but check with a professional for individual advice. I’m not a medical expert, so this is just a ballpark.
Serving Suggestions
When it’s time to slice, I find it simplest to run a knife under hot water briefly, dry it off, and then cut squares. The heat helps glide through the fluffy cherry cheesecake layered delight with vanilla pudding. After placing each piece on a dessert plate, I might spoon an extra dollop of whipped topping over the top just before serving. A few times, I’ve scattered shaved chocolate on top before bringing it to the dinner table. People’s eyes light up!
For bigger get-togethers, you can double this quick cherry cheesecake dessert for crowds by using a larger dish or preparing two separate pans. I’ve done this multiple times for my family reunions—a guaranteed crowd-pleaser.
Frequently Asked Questions
How can I make this dish gluten-free?
Look for gluten-free graham crackers or a similar cookie alternative. The rest of the layers (pudding mix, cream cheese, whipped topping, and cherry pie filling) can often be found in gluten-free varieties. Always check the labels to confirm.
Do I need an oven at all for this recipe?
No! That’s one of the best parts. This easy cherry cheesecake pudding treat is fully no-bake. Chill time replaces the need for any baking.
Can I freeze it for longer storage?
I have tried freezing leftover slices. The texture changes slightly upon thawing, with the whipped topping layer becoming a bit softer. If you don’t mind a little texture difference, freezing is possible. Just thaw it in the fridge overnight.
What if I prefer a tangier taste?
Use slightly less sugar in the cream cheese layer or try a Greek yogurt layer. You could swirl a bit of lemon zest in the pudding layer for a refreshing spin.
Can I use fresh cherries?
Absolutely! Cook them into a sweet sauce if you’d like. Some folks make a homemade cherry compote by simmering cherries with sugar and cornstarch, then let it cool before layering. It brings a fresh fruit note to your cherry cheesecake lush dessert recipe.
What if I want smaller portions?
Try cherry cheesecake layered parfait cups. Create the dessert in individual cups—layer crust crumbs, cream cheese filling, pudding, and cherries. It’s a perfect party trick and easier to serve.
I don’t have a 9×13-inch pan. What else works?
Any similar-sized baking dish works. If you only have a deep round pan, you might get thicker layers. Adapt the layering method to fit the shape. The taste remains delightful.
Cost Insights
On average, I spend around $15 (give or take a few dollars) gathering all the ingredients for a single batch of this cherry cheesecake lush recipe with cool whip, especially if quality cream cheese is on sale. If you already have staples like confectioners’ sugar or vanilla extract at home, your total might be even lower. Buying store-brand pudding mixes and whipped topping can also reduce the cost.
Meal Planning and Pairings
While I primarily serve this dish as a sweet finale, I’ve noticed that pairing it with lighter main courses helps shine a spotlight on dessert. For instance, if you have a summery picnic with grilled chicken or a vegetarian pasta salad, this fluffy cherry cheesecake no-bake delight closes the meal on a cheerful note. During colder months, I’ve set it beside warm coffee and cozy spiced dishes—turns out the contrast is fantastic.
My Final Thoughts and Invitation
Every time I slice into my cherry cheesecake lush dessert recipe, I recall my grandmother’s kitchen and that first day I discovered such a treat. It’s now a staple for family birthdays, potlucks, and random evenings when I crave layers of sweetness. I hope these personal stories, step-by-step instructions, and cautionary tips help you craft your very own dessert success. If you give it a try, I’d be thrilled to hear how it goes for you. And if you have any questions or awesome spins on this dessert, I’m all ears!
Please feel free to visit my
Facebook Page
to share how your version turned out or to check out even more recipes. I love swapping kitchen stories and hearing about your unique variations. After all, the best part of any cooking adventure is sharing it with others!
Here it is one more time: My cherished, tried-and-true cherry cheesecake lush dessert recipe. Whether you’re making it for a potluck or simply whipping it up to treat yourself on a Sunday afternoon, these layers of cherry, cream cheese, and graham goodness promise to put a smile on your face. I hope you share a slice or two with the ones you love—just don’t be surprised when they ask for the recipe.

Leave a Comment