


Introduction
I remember the day I stumbled upon this cherry lush dessert recipe while rummaging through my grandmother’s old index card box. The title alone made me curious, and as soon as I tried it, I was hooked. Over the years, I’ve learned a few tricks, made a few mistakes, and had plenty of sweet moments perfecting it. In this guide, I’ll walk you through how I personally make this dessert and keep it front and center at every gathering.
My approach is laid-back and friendly, so think of me as the friend peeking over your shoulder in the kitchen, saying, “Yes, that’s perfect—keep going!” By the end, you’ll know the ins and outs of this easy cherry lush dessert, including how I prepare a homemade graham cracker crust, whip up the cream cheese layer, and top it off with layers of juicy cherries. Let’s get started.
My Personal Journey with Cherry Lush
I first made this cherry lush dessert recipe out of sheer curiosity. I’d seen a few variations on family potluck tables, but I was never sure where to begin. The first time I tried it, I used stale graham crackers—big mistake. My crust was way too crumbly and fell apart the second I tried to slice it. Even so, the flavor was alluring enough that I refused to give up.
A few tries later, I nailed the perfect ratio of graham crackers and butter, creating a crunchy base that holds firm beneath the creamy cherry lush layered dessert idea. Then I decided to experiment with fresh cherries instead of canned ones. I discovered that if you’re using fresh cherries, you need to pit them carefully and simmer them in a small amount of sugar and water beforehand. Otherwise, they won’t soften enough for that sweet, melt-in-your-mouth finish. It was through these small observations—and, yes, a few mishaps—that I discovered all the little details that make this dessert absolutely spectacular.
Image #1: Raw Ingredients

Tools and Equipment
Before starting this no-bake cherry lush recipe, I gather up my go-to kitchen helpers:
- A 9×13-inch baking dish (for a larger crowd) or an 8×8-inch dish (for a small group).
- A sturdy mixing bowl (or two).
- A hand mixer (or a stand mixer if you like).
- A rubber spatula (for scraping every bit of that creamy goodness).
- Measuring cups and spoons for accurate ingredient amounts.
- A saucepan if you’re using fresh cherries (to cook them down).
I’ve tried different dish sizes, but the 9×13-inch is my favorite because it produces the best cherry lush squares recipe for serving at gatherings. If I want smaller squares, I just cut them tinier.
Ingredients
Essential Items
- 2 cups graham cracker crumbs (about 2 sleeves worth). I love using homemade cherry lush with graham cracker crust because the crunch adds a special touch.
- 1/2 cup melted butter (unsalted). I typically melt it in the microwave in 20-second bursts so I don’t overdo it.
- 1 package (8 ounces) cream cheese, softened.
- 1 cup powdered sugar (sifted if it’s clumpy).
- 1 teaspoon vanilla extract (optional, but I love the flavor).
- 1 box (3.4 ounces) instant vanilla pudding mix. This is part of what makes it a creamy cherry lush delight.
- 1 1/2 cups cold milk (for the pudding).
- 1 can (about 21 ounces) cherry pie filling or 2 cups fresh cherries simmered briefly if you want a cherry lush dessert with fresh cherries.
- 1 tub (8 ounces) whipped topping (thawed). This forms the luscious, airy layer and is key to the cherry lush dessert with whipped topping.
Optional Add-Ons
- Extra graham cracker crumbs for sprinkling on top.
- Chopped nuts, like pecans or almonds, to add crunch if you want a cherry lush dessert with a crunchy crust.
- A dash of almond extract for a subtle twist.
I’ve also seen folks turn this into a simple cherry lush pie variation by using a pie plate, or try layering it into cups for cherry lush dessert cups for parties. The basic ingredients stay the same, and you can easily scale it to feed a bigger group if you’re making a make-ahead cherry lush for crowds.
Step-by-Step Instructions
I typically follow four main steps: crust, cream cheese filling, pudding layer, and cherry topping. Let’s break it down.
Step 1: Making the Crust
- Crush the graham crackers into fine crumbs. If you have a food processor, great—if not, put the crackers in a zip-top bag and pound them with a rolling pin.
- Combine the crumbs with the melted butter in a mixing bowl. Stir until they’re evenly coated.
- Press the mixture firmly into the bottom of your baking dish. Try to make an even layer—I press with the bottom of a measuring cup to get it smooth.
This forms the foundation of your homemade cherry lush with graham cracker crust, which should stick together nicely when chilled.
Image #2: Step 1 in Progress

Step 2: Preparing the Cream Cheese Mixture
- In a fresh bowl, beat the softened cream cheese until it’s smooth.
- Add the powdered sugar and mix again. You’ll see it become velvety and thick.
- Stir in the vanilla extract if you’re using it.
You want this mixture to be creamy and spreadable. Nothing beats that tangy zip from cream cheese that contrasts with the sweet cherries on top. This is one of my favorite steps because it smells so sweet and comforting—it’s basically the heart of this cherry lush dessert recipe.
Image #3: Step 2 in Progress

Step 3: Pudding Layer
- Grab another mixing bowl (or rinse the first one).
- Empty the instant vanilla pudding mix into the bowl.
- Pour in the cold milk and whisk until the pudding thickens, about 2 minutes.
That quick thickening is important. The pudding will add that “custardy” vibe to your cherry lush no-bake summer dessert. If you want a classic cherry lush with vanilla pudding flavor, this is definitely the step not to skip.
Image #4: Step 3 in Progress

Step 4: Assembly
- Spread the cream cheese mixture over the chilled crust. Aim for an even layer—but if it’s not perfect, don’t worry. I’ve had some lumps here and there, and it still tastes amazing.
- Gently spread the pudding layer over the cream cheese layer.
- Top it all off with half of the whipped topping. Make it smooth or swirl it decoratively—your call.
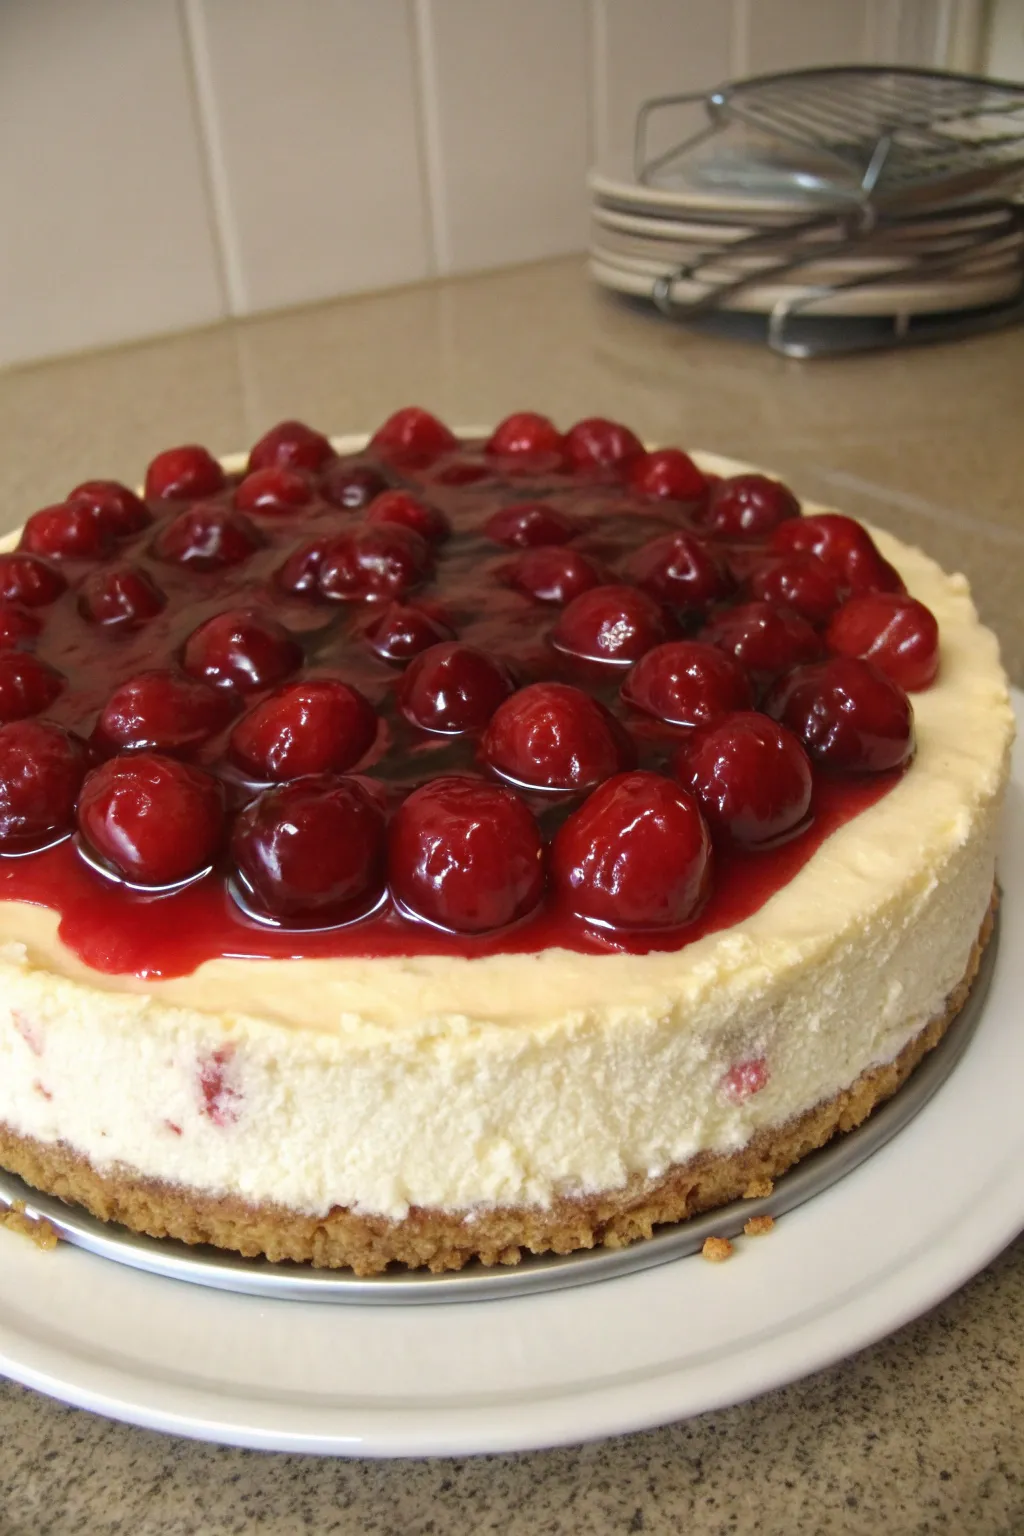
- Finally, spread the cherry pie filling on top, or spoon on your fresh cherry mixture if you’re going that route.
This combination transforms into a creamy cherry lush delight that’s both visually appealing and comforting to eat. Whenever I bring it to a potluck, people always exclaim it’s a cherry luscious treat for potlucks like no other.
Chilling
I like to let it chill in the fridge for at least 4 hours, but overnight is ideal. This waiting period helps the layers set, especially the pudding.
Image #5: Final Dish

Helpful Tips & Variations
- For a no-bake cherry lush recipe: You can skip baking the crust entirely if you prefer a softer bite. Press it firmly in the pan and chill it for an hour before adding the layers.
- For a simple cherry lush pie variation: Use a 9-inch pie dish and follow the same steps, just reduced by about half if you don’t want super-thick layers.
- For a cream cheese cherry lush layer cake style: Layer the crust, cream cheese mixture, pudding, and cherries in a cake pan, then slice like you would a traditional cake.
- For fresh cherries: Pit them and place them in a saucepan with a tablespoon or two of sugar and a bit of water. Heat gently until they soften, about 5 minutes. Let them cool before layering.
- Quick and simple cherry lush tip: If you’re in a rush, buy a pre-made graham cracker crust and just focus on layering the cream cheese, pudding, whipped topping, and cherries.
Storage and Leftovers
I keep leftovers covered in the fridge, and they stay good for up to 3 days. The crust can soften over time, so it’s best to enjoy your easy cherry lush bars for sharing sooner rather than later. If you want to keep it longer, you can freeze individual squares in airtight containers. Thaw overnight in the fridge, and they’ll still taste pretty great.
Common Mistakes I’ve Made
- Too much milk in the pudding layer: This leads to a soupy dessert that never sets. Stick to the instructions on the box.
- Forgetting to soften the cream cheese: It can lead to lumps. Take it out of the fridge well ahead of mixing.
- Over-sweetening the cherry layer if you choose fresh cherries: Start small with sugar, because cherries can already be quite sweet.
- Slicing too soon: I’ve tried to cut it right after assembly, only to watch the layers slip and slide. Chilling is key.
Serving Suggestions
I serve this decadent cherry lush holiday dessert with a few fresh cherry halves on top, or I add a handful of chopped nuts if I want more crunch. Sometimes I dust the top with leftover graham cracker crumbs or drizzle some chocolate sauce for extra glamour. If you want little party portions, scoop spoonfuls of each layer into small cups, creating cherry lush dessert cups for parties—a brilliant way to serve individual treats.
Nutritional Info (Approximate)
- Serving size: 1 square (if cutting 12 squares from a 9×13-inch dish)
- Calories: Around 250–300 (depends on specific brand ingredients)
- Carbs: Primarily from graham crackers, pudding mix, and cherries
- Fats: Cream cheese and whipped topping are the main contributors
I’m not a medical professional, so if you have specific dietary needs, consult a registered dietitian or relevant expert. You can check USDA guidelines for general food safety and handling tips.
Frequently Asked Questions
How can I make this gluten-free?
Use gluten-free graham crackers for the crust. The rest of the ingredients—cherries, cream cheese, pudding mix—can also be found in gluten-free varieties if you read the labels carefully.
What if I don’t have a mixer?
You can beat the cream cheese mixture with a wooden spoon if it’s well-softened. It’ll take more arm power, but it’s doable. Just try to get the cream cheese as close to room temperature as possible before mixing.
Can I freeze leftover slices?
Yes. Wrap individual squares tightly in plastic wrap and then place them in a freezer-safe container. Thaw them in the fridge when you’re ready to eat. The texture remains pretty good, though the crust might be slightly softer after being frozen.
Can I use another fruit topping?
Sure! I’ve seen friends substitute blueberry or strawberry pie filling. If you’re feeling adventurous, try mixing various berries for a colorful layered dessert. The method remains the same.
Do I really need whipped topping?
It’s part of the classic style and makes it a cherry lush dessert with whipped topping. However, if you prefer homemade whipped cream, that works too—just whip until stiff peaks form.
Can I skip the pudding layer?
You can, but you’ll lose some thickness and sweetness. The pudding contributes a distinct flavor that merges well with the cream cheese and cherries, giving you that best cherry lush squares recipe vibe. If you skip it, consider adding a bit more whipped topping or a different layer for texture.
Can I make this dessert in smaller cups?
Absolutely. Create mini versions of cherry luscious treat for potlucks by layering each component into single-serving cups. It’s a fun party trick and ideal if you don’t want to worry about slicing.
Conclusion
I hope my personal take on this cherry lush dessert recipe has you excited to give it a try. After testing so many versions—some successful, some not so much—I can confidently say this sweet layered creation is worth every step. Whether you serve it as easy cherry lush bars for sharing, opt for a cherry lush dessert with cream cheese filling, or make a make-ahead cherry lush for crowds, it’s bound to bring a smile to anyone who tastes it. The layers fuse into a creamy, sweet blend that I keep coming back to time and time again.
If you’ve enjoyed following along, feel free to drop a comment or share your own tips. And if you’re looking for more recipes or just some friendly cooking anecdotes, I invite you to check out my
Facebook Page. Here’s hoping your kitchen adventures are as memorable as mine!
Enjoy your slice (or two) of this creamy treat! And remember—you can always tweak the layers, try fresh cherries, or add an extra zing if that’s what makes you happiest. Happy layering!
Print
Unleash Sensational Flavor: Exclusive Cherry Lush Dessert Recipe!
- Prep Time: 30 minutes
- Cook Time: 0 minutes
- Total Time: 4 hours 30 minutes
- Yield: 12 squares 1x
- Category: Dessert
- Method: Baking
- Cuisine: American
- Diet: Vegetarian
Description
A delightful cherry lush dessert with layers of graham cracker crust, cream cheese, pudding, whipped topping, and cherries. Perfect for gatherings and potlucks.
Ingredients
- 2 cups graham cracker crumbs – about 2 sleeves worth
- 1/2 cup butter – unsalted
- 1 package (8 ounces) cream cheese – softened
- 1 cup powdered sugar – sifted if clumpy
- 1 teaspoon vanilla extract – optional
- 1 box (3.4 ounces) instant vanilla pudding mix
- 1 1/2 cups cold milk
- 1 can (about 21 ounces) cherry pie filling
- 1 tub (8 ounces) whipped topping – thawed
Instructions
- Crush the graham crackers and mix with melted butter for the crust.
- Prepare the cream cheese mixture with powdered sugar and vanilla.
- Create the pudding layer by mixing pudding mix with cold milk.
- Assemble by layering cream cheese mixture, pudding, whipped topping, and cherry filling.
Notes
Leftovers can be stored covered in the fridge for up to 3 days.
Nutrition
- Serving Size: 1 square
- Calories: 275
- Sugar: 20g
- Sodium: 250mg
- Fat: 15g
- Saturated Fat: 8g
- Unsaturated Fat: 5g
- Trans Fat: 0g
- Carbohydrates: 30g
- Fiber: 1g
- Protein: 3g
- Cholesterol: 30mg

Leave a Comment